Documentation for the support system
Dashboard page
This page helps you manage support requests and tasks in a simple, visual way. Everything is organized on a Kanban board, letting you see at a glance what is new, what is currently in progress, and what has already been completed. You can easily move items between stages, update details, and keep track of priorities. The board gives you a clear overview of ongoing work, helps prevent missed requests, and makes team collaboration more efficient and transparent.
How to Use the Dashboard
1. Browse tasks by status
Requests move through stages such as New, Offer, Verification, In Progress, In Review, and Done.
Each column shows exactly where an item is in the workflow.
2. Open task details
Click any card to view more information, add notes, or update the task.
3. Follow priorities
Tasks are marked with colored indicators:
Red = critical
Purple = height priority
Yellow = low priority
4. See who is responsible
Each card displays the initial of the assigned team member.
5. Organize by groups
Tasks may be grouped (e.g., “office”, “user”) for easier navigation and filtering.
What You Can Do Here
Create new support requests
Track progress in real time
Assign tasks and update their status
Review completed work
Keep your team aligned and transparent
Main Features
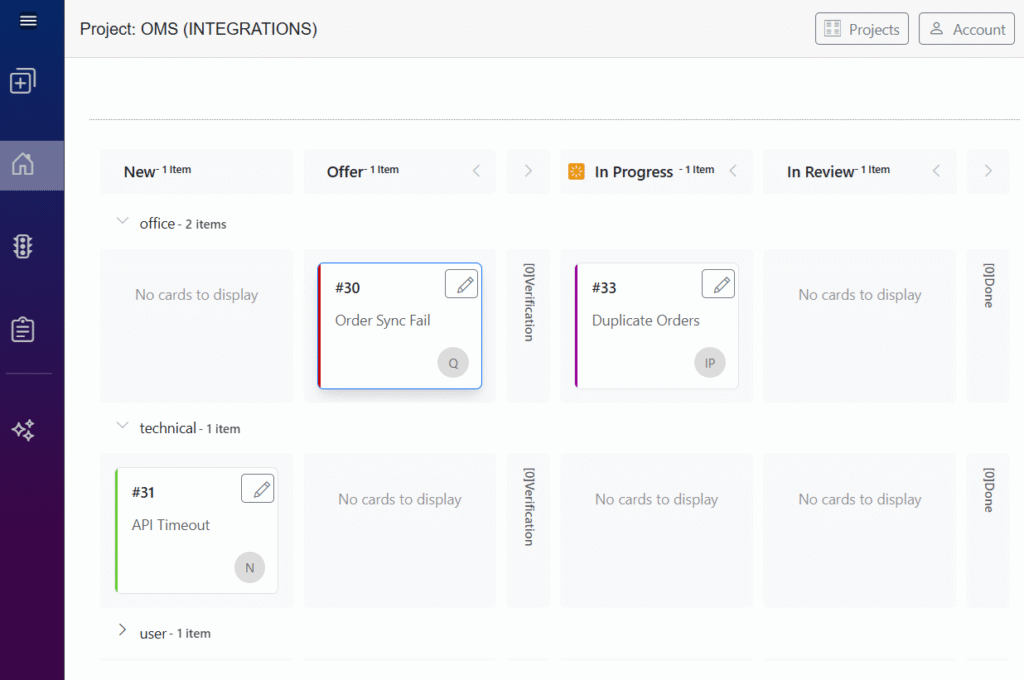
1. Workflow Columns (Kanban Board)
The page is divided into several workflow stages, each represented by a column:
New – currently no items
Offer – 1 item
Verification – 2 items
In Progress – 0 items
In Review – 0 items
Done – 1 item
Each column shows how many task cards it contains.
2. Groups / Categories
Within the board, tasks are grouped by category:
office – 3 items
user – 1 item
These categories expand/collapse to show task cards that belong to each group.
3. Task Cards
Each task is displayed as a card that includes:
Task ID (e.g., #12, #17, #14, #13)
Short description (e.g., “zgłoszenie #4T”, “zgłoszenie #n1”)
Colored indicator on the left edge (red, yellow, purple) – likely representing priority or status
Assigned user icon (a letter symbol)
Edit icon for modifying the task
Cards appear under the stage that matches their current status.
4. Empty Spaces
Columns without items show a placeholder message:
“No cards to display”
This helps the user quickly see which stages are empty.
Purpose of the dashboard
This interface is designed to help users:
Track and manage support requests
View task status at a glance
Assign or reassign tasks
Monitor workflow progress from initial request to completion
Organize items by category (e.g., “office”, “user”)
Step-by-Step Instructions
1. Open the Project Dashboard
When you enter the system, you’ll see the project name at the top (e.g., OMS (INTEGRATIONS)).
This is your workspace where all support requests are managed.
2. Understand the Board Layout
The page uses a Kanban-style layout with columns representing stages of work:
New
Offer
Verification
In Progress
In Review
Done
This helps you instantly see the status of all tasks.
3. Browse Tasks by Category
Below the columns, tasks are grouped (e.g., office, user).
Click the arrow next to the group name to expand or collapse it.
4. Open a Task
Each request appears as a card.
Click the card to view:
Description
Priority
Assigned user
Additional details or comments
5. Edit a Task
Use the pencil icon on the card to:
Update the description
Change priority
Assign someone
Add notes or attachments
6. Move a Task Through the Workflow
Tasks progress by changing their status.
Move them from one stage to another (e.g., from New → Verification → In Progress → Done) based on their progress.
7. Check Priority Indicators
Each card has a colored stripe:
Red – Critical
Purple – How priority
Yellow – Low priority
Use this to decide which tasks require attention first.
8. Track Assigned Users
The small circle with a letter shows the user responsible for the task.
Hover over it (if available) to see the full name.
9. Monitor Progress
Empty columns display “No cards to display”, which helps you easily see workload distribution.
10. Review Completed Items
The Done column lists tasks already completed.
You can open them to view history or confirm final details.
📘 Quick Start Guide
1️⃣ 🏁 Enter the Project
Open the dashboard and check the project name at the top.
This is your workspace for all support tasks.
2️⃣ 🗂️ Understand the Board
View tasks arranged in columns:
New → Offer → Verification → In Progress → In Review → Done
Each column shows the current stage.
3️⃣ 📂 Expand Categories
Click the ▾ arrow next to groups like office or user
to show or hide tasks.
4️⃣ 📄 Open a Task Card
Click any card (e.g., #12) to view:
📝 Description
🎯 Priority
👤 Assigned user
💬 Comments
5️⃣ ✏️ Edit the Task
Use the ✏️ pencil icon to change details, assign someone, or add notes.
6️⃣ 🔄 Move Through Stages
Update the task status to move it along the workflow.
This reflects real progress (e.g., Verification → In Progress).
7️⃣ 🎨 Follow Priority Colors
Each task has a colored stripe:
🔴 Critical
🟣 High priority
🟡 Low priority
8️⃣ 👥 Check Responsibility
The circle with a letter shows who is assigned (e.g., V, O, F).
9️⃣ 📊 Monitor Workload
Empty columns display
“No cards to display”
making it easy to spot stages with no tasks.
🔟 ✅ Review Finished Work
The Done column contains all completed tasks for final checks.